Did you know that having too much content on your website actually might be hindering you more than it is helping you? With it being the start of the year, I like to do a full site review of all of my clients, by URL, to make sure all content on their sites is actually pulling its own weight. I often think of this process as employees at your company. Like employees, every piece of content on your website should be pulling its own weight and providing some sort of value. If not, it’s time to rethink its purpose or need. Should you remove it? Rewrite it? How do you get the data you need to make sure you are making the right decisions on what to do?

Well, this post is about just that. I am going to walk you through my entire process of cutting content, from crawling all live URLs to pulling in all of the data.

Jump To:

What do you need to successfully do the review?

Before we begin, I want to ensure that you have the necessary access to tools and data. This will be imperative to be able to pull everything into one spot. Here is the tool stack I use to consolidate all the data into one location, by URL, so you can successfully handle a valuable content prune.

Before we get started, I want to make sure that you have the proper access to tools and data. This will be imperative to be able to pull everything into one spot. Here is the toolstack that I use to get all of the data into one spot, by URL, so you can successfully handle a valuable content prune.

Screaming Frog (Paid)

If you do not have a paid version of Screaming Frog, you can go and download it here. The paid versions allows us to link up with APIs that will make pulling the data far easier, with less reliance on Google Sheets equations like vLookup and CountIF (we’ll still use that a little bit later down the line).

Why do you need the paid version?

As mentioned, having the paid version will allow us to make sure we can access all of the URLs to crawl (you might have more than 500), it allows you to change the crawl mode so instead of spider, we can use the copy and paste features to crawl XML sitemaps, and then lastly, we will want to link up with Google Analytics and Google Search Console using the API. This will let us pull the data in more easily.

Google Analytics 4

Of course, we want to look at the organic value of each of these URLs so you will need access to the Google Analytics 4 property for the website. You can leverage third-party data from things like Ahrefs or Semrush, but I like using first-party data so that it is more accurate and I am making changes based on real data that we’ve had over the past 12 months.

Google Search Console

We are going to want to combine our GA4 data with Google Search Console data as well, so that we can get the full picture. Maybe you have a page that has gotten very few clicks and sessions, but it is getting a lot of impressions. Having this data will make it easier for you to make strong, well-informed decisions. A few tweaks to that page could improve it and start to get it ranking higher and gaining more clicks.

Ahrefs OR Semrush

I personally like using Ahrefs, but you can use Semrush as well. What we will do with this information is pull all of the keyword rankings for a website, as well as the total number of backlinks, by URL. It’s important to combine this information with your full data set so that you can see how many total rankings, page 1 rankings, and individual backlinks each URL has.

Crawling With Screaming Frog (Paid)

So, let’s get to it. First, we are going to crawl the entire site with Screaming Frog, using the paid version. Here are the steps to do this quickly and efficiently.

  1. In Screaming Frog, change your crawl mode from the default “Spider” to “List.” You can change that setting by going to Mode -> List. On Mac, it will look like this: Screaming Frog Mode Change
  2. Then, we need to go and configure the Google Analytics 4 and Google Search Console APIs to pull the data.
  3. Configuring Google Analytics 4
    1. Click on Configuration → API Access → Google Analytics 4. You can get there by following these steps. Screaming Frog Google Analytics 4 API Access
    2. You will then sign into the Google account that has access to the website’s Google Analytics 4 property and data stream. Click the blue Sign in with Google button. Sign in With Google
    3. You will then be taken to your browser where you can sign into the Google Account and then give Screaming Frog full access.
    4. Once you log in, your Screaming Frog will then update and allow you to be able to access and configure the property.
    5. Select the correct Account, Property, and Data Stream for the website you are about to crawl. Google Analytics Account, Property, and Data Stream
    6. Then, go to the Date Range menu item inside this screen and set the range to the past 12 months. We want to make sure we are looking at a long enough time period to make informed decisions. Google Analytics Date Range
    7. Next, go into the Metrics menu item and select the metrics that you want to look at. Depending on the type of website, you might want to look at different pieces of information. Here are the default metrics I choose when doing this (not eCommerce).
      1. Event → Key Events (conversions by page)
      2. Page / Screen → Views (screenPageViews)
      3. Session → Sessions (sessions).
        1. This is a default setting that will always be checked at bare minimum.
        2. User → Total Users (totalUsers)
        3. User → New Users (newUsers)
    8. Lastly, go into the Filters menu item so that we can set the dimension to show only Organic Search traffic (for the purposes of this analysis).
      1. Your settings should look like this. Google Analytics Filter Setup
  4. Configuring Google Search Console
    1. Then, we need to do the same thing here for our Google Search Console set up.
    2. In your configuration screen, go to Google Search Console in the left-hand menu.
    3. Click on the blue Sign in with Google button again, and select the correct Google account that has the Google Search Console property.
    4. Select the correct property in the next screen. Google Search Console Property
    5. In the Search Analytics tab, select the same date range of Past 12 Months.
    6. Lastly, go into the URL Inspection tab and check Enable URL Inspection.
      1. This will crawl the pages and then give you back important information like date it was last crawled by Google, if it is indexed or not, and the reason it may not be indexed.
  5. Now we are ready to crawl! Go back to the website and find the XML sitemap.
    1. Usually, that can be found at example.com/sitemap.xml or example.com/sitemap_index.xml.
  6. Depending on how the sitemap is set up, go into each sitemap and copy and paste the URLs into a fresh new Google Sheet.
    1. I’ve created a template that you can use and reference here. Just make a copy and add the URLs to the sheet labeled Sitemap URLs.
    2. Name the sheet something like {{CLIENT NAME}} – URL Analysis
  7. Once you have all of the URLs in one spot, copy the entire list and go back into Screaming Frog.
  8. Click on Upload and paste. This will paste what is on your clipboard and show you a screen like this. It will tell you how many URLs it processed from that, as well as if there were any duplicates that it noticed and removed. Screaming Frog Upload List
  9. Once that has processed, click Ok and the crawl will start running. It will give you a crawl progression and API progression bar so you can verify that the API is running as well. It will look like this. Screaming Frog Crawl Progression Bars
  10. Let the crawl fully run, and once completed, move on to the next step to compile the data.

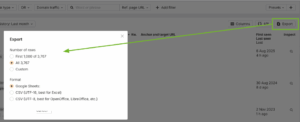
Exporting the data into a spreadsheet (Google Drive)

Once the crawl is finished running and the API has done its thing, it’s time to get this information into a place where you can actually analyze it and make some decisions from. I leverage Google Sheets / Google Drive so that the sheet can be easily shared with stakeholders and other people, and version history remains intact.

  1. Click the export button in Screaming Frog at the top left of the screen.
  2. Once you are here, you can change the export method to pull into Google Drive rather than export to a spreadsheet.
    Screaming Frog Save Location Screen
  3. Log in to the account you want to export with and then click Save and Open. 
  4. This will save the export and then open automatically for you in your browser.
  5. From here, we want to copy the crawl and then paste it into the sheet labeled Crawl With Data. 
  6. Once that is there, we want to pull the important information into the Full Review tab. This is what I usually carry over.
    1. Address – the URL
    2. Status Code – the status code for that URL
    3. Status – the actual status based on the status code
    4. Title 1 – the title tag
    5. Meta Description 1 – the meta description
    6. H1-1 – the H1 for that URL
    7. GA4 Sessions – the organic sessions for that URL in the past 12 months
    8. GA4 Views – the organic views for that URL in the past 12 months
    9. GA4 Key events – the organic conversions for that URL in the past 12 months
    10. GA4 Total users – the organic total users for that URL in the past 12 months
    11. GA4 New users – the organic new users for that URL in the past 12 months
    12. Clicks – the clicks to that URL in the past 12 months
    13. Impressions – the impressions to that URL in the past 12 months
    14. CTR – the click-through-rate of that URL in the past 12 months
    15. Position – the average position of that URL in search over the past 12 months
    16. Summary – this is the indexed summary for that URL, whether it is on Google or not indexed for whatever reason
    17. Coverage – this is the coverage definition for that URL, depending on whether it is indexed or not
    18. Last Crawl – the date the URL was last crawled by the Google bot
    19. Days Since Last Crawled – the number of days it’s been since the URL was last crawled
  7. Now that we have the data from the crawl, it’s time to make some edits to the sheet for easier review and access. Here is what I usually do.
    1. Add a filter to the data and then sort largest to smallest in the GA4 Sessions column.
    2. Go all the way to the bottom and look for the last value before there is nothing in the cell.
    3. In that first cell with no value in this column, add “0” and drag all the way down and then over to the Clicks column.
      1. If there was no data for that metric, Screaming Frog will leave the cell blank and not add a “0”. We had the “0” so that we could more easily filter and review the data.
    4. Then go back to the first row and sort the data by Clicks, largest to smallest, and do the same thing.
  8. Then, go to the column labeled Summary. We are going to select all of this data and then convert it to a dropdown so you can color-code.
    1. To do this, right-click after you select all of the values and choose Dropdown. 
      Google Sheets Create Dropdown
  9.   I usually color-code by bright green and bright red for this one. Something like this:
    Google Sheets Color Code Dropdown
  10. Then, for the column right next to this one, labeled Coverage, do the exact same thing. Color code how you would like to.
  11. Your spreadsheet should now look like this with all of the URL information, organic data, and coverage summaries. 
    Spreadsheet Example

Now that we have the full crawl with data cleaned up and looking good, we are going to go and pull all of the keyword rankings and backlinks for the site, sort by URL, and match with our data set.

Adding keyword rankings (by URL)

While we have all the traffic information, it’s essential to also track the total number of rankings and page 1 rankings for each URL. This will help us paint a better picture overall. I use Ahrefs for this, but you can use your keyword ranking tool of choice.

  1. In your review tab, add 3 more columns to the far right and label them Total Rankings, Page 1, and Backlinks.
  2. Go to the tool of your choice and export all of your keyword rankings, but URL.
  3. In Ahrefs, crawl the site and go to Organic Search → Organic Keywords.
    Ahrefs Access Keyword Rankings
  4. Once there, go to the Export button at the top right of the screen, right below the graph.
  5. Link up your Google Account and export all rankings to a Google Sheet.
    Ahrefs Export Keyword Rankings
  6. Once the export finishes and opens, copy and bring back to the main spreadsheet and add to the sheet labeled “Keyword Rankings.”
  7. In the template, I left 3 columns to the left for URL, Total Rankings, and Page 1 Rankings.
  8. Once you paste the data in the spreadsheet, copy column Y labeled “Current URL” and paste the values in column A.
  9. Then, highlight that entire column and go to Data → Data Cleanup → Remove Duplicates.
    Google Sheets Remove Duplicates Function
    Click to Enlarge
  10. This will show us only unique URL and from here, we are going to count the total number of rankings and page 1 rankings by each unique URL.
  11. To do that, in cell B2, we are going to use the Countif formula. It will be used to count each individual ranking and URL to tell us how many total rankings each URL has.
    1. Formula to use: =countif(Y:Y,A2)
  12. Then, we want to do the same thing for the page 1 rankings. Sort the ranking data by Current Position, which will likely be in column S or T, depending on how you adjust the spreadsheet.
  13. Using the same Countif formula, we are going to pull only the rankings between positions 1 – 10 to be counted. The formula will look something like this in Cell C2: =COUNTIF($Y$2:$Y$1344, A2). 
    1. It’s important to only highlight the URLs that are between positions 1 – 10 in the formula. Then, make sure to wrap it in the dollar sign ($) so that the data doesn’t move as you pull it down.
  14. Then, we need to go back to the full review sheet and in the first column for total keyword rankings, we are going to use a vLookup formula to find the rankings for each URL in the sheet, and associate it properly with this row for that URL.
    1. =VLOOKUP($A$3:$A$991, ‘Keyword Rankings’!$A$2:$C$289, 2, FALSE) – Using this formula, you can tell Sheets to go look for the URL in the other data set and give you back the number in the second column, which is “Total Rankings.”
  15. Lastly, do the same thing for the page 1 rankings, using this formula.
    1. =VLOOKUP($A$3:$A$991, ‘Keyword Rankings’!$A$2:$C$289, 3, FALSE) – the only thing that changes here is the column to bring back values, which would be column 3 for the page 1 rankings.

For some of these formulas, here is a bit more information from Google about what they are and how to leverage them.


Adding Backlinks (By URL)

The last piece to this puzzle is going to be pulling in the backlinks that each URL has. We are going to follow a similar process to the keyword rankings one above, but specific to links.

  1. While you are in Ahrefs, in the left-hand menu, go to Backlink Profile → Backlinks.

    Ahrefs Backlinks Profile

  2. This will take you into the entire backlink profile of the site. When I am doing this type of analysis, I want to see the entire list of links for each page, so in the settings, make sure you select All Backlinks and not Group Similar or One Per Domain.
    Ahrefs All Backlinks
  3. Once that loads, click Export in the top right of the screen to grab the links in a Google Sheet (this makes it easier for transferring to your current sheet).
    Ahrefs Export Backlinks
  4. Once you open the Google Sheet, copy and paste that into the sheet in your analysis labeled “Backlinks.”
  5. Now, we are going to organize the data by URL to get an idea of how many individual links each URL has.
    1. This is important because if you decide to cut some content, you want to know how many links you are potentially redirecting and how to go about getting them updated. It can also inform whether or not you want to prune the content or not.
  6. Once it’s in the main sheet, add 3 Columns to the left.
  7. Take the Column Labeled “Target URL” and copy and paste that into your new column A.
  8. Now select that column and hit “Data” in the Google Sheets menu, Data Cleanup, and then remove duplicates, much like we did with the keyword task above.
    Goolge Sheets Remove Duplicates Function
  9. Label column B “Total Links”.
  10. Then, in cell B2, use this formula to have sheets tally up how many individual links each page has pointing to it.
    1. =COUNTIF(R:R,A2) (depending on your columns, it may not be R:R as the selection).
    2. It is important to grab that entire column so it counts all links.
  11. Do a quick check to ensure that the numbers align with the total number of links.
  12. Next, we are going to go back into the “Full Review” sheet and do another quick VLOOKUP function to merge the data.
    1. Here is the formula to use, but make sure that the selection is correct for your specific set of data: =VLOOKUP($A$3:$A$991, Backlinks!$A$2:$B$270, 2, FALSE)

And there you have it! You have now compiled a robust analysis of the organic performance of your website all in one spot. Now what?

Analyzing and Making Decisions

At this point, you now have what most sites rarely ever do: a URL-level performance document that combines 12 months of organic traffic, visibility, all rankings, indexation, and authority signals in one place.

This is where content pruning either becomes a strategic advantage or a dangerous guessing game. The goal here is not to delete content aggressively and haphazardly. Our goal is to make defensible decisions for every URL based on real performance data. Identifying poor performers and content that is indexed and not doing anything is a great place to start for content pruning. If you need a hand making decisions, here’s how I go through my decision-making process with the data.

I bucket every URL into one of four outcomes:

  • Keep as-is
    • No touchy. This URL is performing, performing well, and doing its job.
  • Rewrite/improve
    • This is content that is doing okay, but could be doing better. Potential to be rewritten and updated or improved in other areas.
  • Consolidate and redirect
    • This is content that may score some points here and there, but has very little, if anything, going on for it. Maybe some backlinks that we can redirect into a more worthy page.
  • Kill/Prune (remove)
    • This is content that has nothing. Hasn’t produced a ranking, link, impression, click, or conversion over the past 12 months. Bye Bye! 

Start With GA4 Sessions (Reality Check)

In the Full Review tab, add a filter and sort the GA4 Sessions column from largest to smallest. This will immediately tell you which URLs are actually contributing organic value. For URLs with consistent sessions over the past 12 months, review:

  • GA4 Sessions
  • GA4 Key Events
  • GA4 Views
  • GA4 Total Users / New Users

If a page is generating traffic and conversions, it has earned its place on the site. These pages should almost never be deleted or rewritten aggressively.

At most, they may need:

  • Minor on-page optimization
  • Internal linking improvements
  • CTR improvements via titles and meta descriptions

First rule of SEO, always: if it’s working, don’t break it. Or in other words, something I learned early on in my career….”First, Do No Harm!”

Find Opportunity Pages Using Impressions vs Clicks

Next, sort by Impressions, largest to smallest, and compare against:

  • Clicks
  • CTR
  • Position

These URLs are often your biggest opportunities to improve or even rewrite. Common patterns you’ll see:

  • High impressions, low clicks
  • Average position between 8–20
  • Low GA4 Sessions despite visibility

This usually indicates an intent mismatch or SERP competition issue, not a content quality failure. These pages are prime candidates for Rewrite / Improve, not pruning.

Typical fixes include:

  • Rewriting the Title 1 to better match search intent
  • Improving the Meta Description 1 for clarity and relevance
  • Updating the H1-1 and opening section to answer queries faster
  • Expanding thin or outdated sections

If Google is showing the page, deleting it is often the wrong move.

Use Keyword Depth to Avoid Bad Pruning Decisions

Now bring in the keyword columns:

  • Total Rankings
  • Page 1

Pages with multiple rankings, even if traffic is low, are still contributing to topical relevance and long-tail coverage. A page with:

  • Low GA4 Sessions
  • But solid Total Rankings
  • Or a few Page 1 terms

…is usually underperforming, not useless.

These URLs often act as:

  • Supporting content
  • Internal linking targets
  • Long-tail entry points

They belong in the Rewrite / Improve bucket far more often than the prune bucket.

Backlinks Are a Hard Stop Signal

Before pruning anything, review the Backlinks column. If a URL has backlinks pointing to it, deleting it without a plan is risky.

Ask:

  • How many backlinks does this page have?
  • Is there a stronger, closely related URL to consolidate into?
  • Should this page be redirected instead of removed?

Pages with backlinks almost always fall into one of these buckets:

  • Keep and improve
  • Consolidate and 301 redirect

Straight pruning pages with backlinks should be rare and intentional.

Validate Indexation and Crawl Signals

Now check:

  • Summary
  • Coverage
  • Last Crawl
  • Days Since Last Crawled

These columns help confirm whether Google:

  • Can access the page
  • Is indexing it
  • Still considers it relevant enough to recrawl

Common red flags;

  • Indexed pages with zero sessions, zero clicks, zero rankings
  • Pages not crawled in a long time
  • Pages indexed with no clear purpose

These are often strong prune candidates, assuming they also lack rankings and backlinks.

The Decision Framework (By URL)

Once all signals are reviewed together, decisions become straightforward.

Keep As-Is

  • Consistent GA4 Sessions and/or Key Events
  • Rankings and/or backlinks
  • Clean indexation

Minimal changes only.

Rewrite / Improve

  • Indexed
  • Impressions without clicks
  • Rankings but underperforming
  • Thin, outdated, or misaligned content

These are usually your highest ROI pages.

Consolidate / Redirect

  • Overlapping intent across multiple URLs
  • Keyword cannibalization
  • Backlinks split across similar pages

Merge into one strong URL and redirect the rest.

Prune

  • GA4 Sessions = 0
  • Clicks = 0
  • Impressions = 0
  • Total Rankings = 0
  • Backlinks = 0
  • Indexed for no strategic reason (or not indexed at all)

These pages are dead weight and should be removed. This is where the value starts to come in. Once you are able to identify dead weight, you can start to remove that content and give your more valuable content an even better fighting chance. This is all about crawl budget and keeping the bots on the pages that matter, are performing well, or could be performing better. Not pages that have done nothing for you in a year. 

Document the Decision

Finally, add one more column to the Full Review tab:

  • Action or Decision

Every URL gets a label:

  • Keep
  • Rewrite
  • Redirect
  • Remove

This turns your spreadsheet into an execution plan, not just an audit.

It also gives you:

  • Clear prioritization
  • Stakeholder clarity
  • A historical record of why decisions were made

Template To Use

Thanks for hanging with me through this post. I know it’s a long one, but there are a lot of moving pieces and a lot of things to review when going through your content pruning plan and strategy. I have created the exact template that I use for all of my content pruning tasks and made it available below. No sense recreating the wheel. We’re all grown-ups, feel free to steal my template and make it fit into your content pruning needs.

Good luck and have fun!

Author, Logan Mosby

Logan Mosby

Since 2015, I have been specializing in all areas of SEO ranging from advanced technical SEO to local, enterprise, national, and international SEO campaigns. I’ve helped grow agencies through specialized training curriculums and learning management systems to achieve quality consistency. I have a passion for helping teach people the ins and outs of SEO strategy, tactics, execution, and more!

Connect With Me!


Categories

GDPR